< Tutorials LONG ARMING IDEAS – PRO STITCHER POSSES GROUP
Hi there fellow Pro Stitcher Posse members:I love our group and everything the we share.
I tried to post on our shared FB but apparently my .jpg was too fuzzy when you enlarged it, so I’m going to try to explain how I quilted this piece. First let me say, I am self-taught and have only been long arming for a little over a year. I have the Infinity with Premium Pro Stitcher. So here goes…
My client brought me her liberated basket quilt which she began in one of my workshops several years back. She wanted it custom quilted and baskets are not easy shapes to crop out. First I looked for a design that ran more horizontal so that I wouldn’t have millions of jumps to do and the ones I had would mostly be horizontal and easy to work with. I found this great design that I purchased from www.jukeboxquilts.com Created by Valerie Thor who has several like this in a series, I used Tangled Waves pattern 1 I purchased this for $20.00. The design is 100″ wide, so no horizontal repeats were needed.
I set up my machine with the total size of the quilt…41″ x 49″ and did an all over edge to edge. Saved it as my workspace. I will need to open edit, crop, stitch many many times more, so make sure you keep your original design so you can readily match up the design.
I’m the kind of person that learns as I go – so you will see how I first attacked this challenge and in the end, you will see how I adapted and accommodated previous problems with new solutions.
Original Quilt:
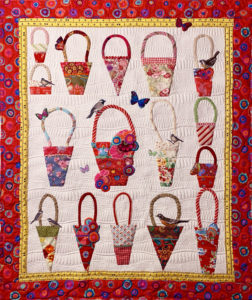

See how the design will fit?

In the first row (sew out is shown in blue above) – three rows of designs.. oval, greek key and zig zag. initially, I sewed this horizontally as one design, I had to isolate all of the basket handles and even some of the baskets so that it would sew out.

Sewing out the white area that I cropped.

What I learned while doing that was when I sewed out the greek key and got to the zig zag, the machine wanted to run another perimeter around the design and that was too much stitching, but it worked well with the insides of the handles because it made a clean perimeter,
but for the other areas, I wanted to stop/start where I knew it was going to re-trace my stitches. I decided to split up my design by cropping the 3 horizontal designs into 3 separate files. (Ovals, Greek Key and Zig-Zag)

I wanted to use a complete row of the design when it would not be dissected completely through.

Here is the first of the 3 rows

I sewed this row (ovals) in one horizontal run, cropping out the handle areas, which then allowed the new shape area between the baskets… See the turquoise dotted shape?

But then I decided that working between the basket shapes made a great area to cop and quilt, just like I did with the insides of the handles and finished up!
Hope this makes sense to you Pro-stitchers! Happy sewing! Any other questions, email me at Jean@SewJean.com